Building A Scalable Node.js Application With Aws Eks And Ci/cd Pipeline
Introduction
In today's digital landscape, building applications that can gracefully handle increasing user demands isn't just a nice-to-have—it's essential for business success. Just as a well-designed bridge must withstand varying traffic loads while maintaining its structural integrity, modern applications need robust architecture that can scale seamlessly with growing user demands.
Building a scalable Node.js application is analogous to constructing a sturdy, flexible bridge. Just as a bridge needs solid foundations and seamless paths to handle increasing traffic, your application requires a robust architecture and smooth deployment pipelines to support growing user demands.
In this comprehensive guide, we'll leverage AWS EKS (Elastic Kubernetes Service) to provide the structure, and implement a CI/CD pipeline to ensure smooth, automated updates, enabling your Node.js application to scale effortlessly as traffic increases.
Architecture Overview
Our solution implements a modern, cloud-native architecture utilizing the following components:
🔧 Core Components
- Application Runtime: Node.js with Express
- Containerization: Docker
- Container Orchestration: AWS EKS (Kubernetes)
- Database: MongoDB
- Object Storage: AWS S3
🚀 DevOps Tools
- Container Registry: Amazon ECR
- CI/CD Pipeline: AWS CodePipeline
- Load Balancing: AWS Application Load Balancer (ALB)
- Monitoring: Amazon CloudWatch
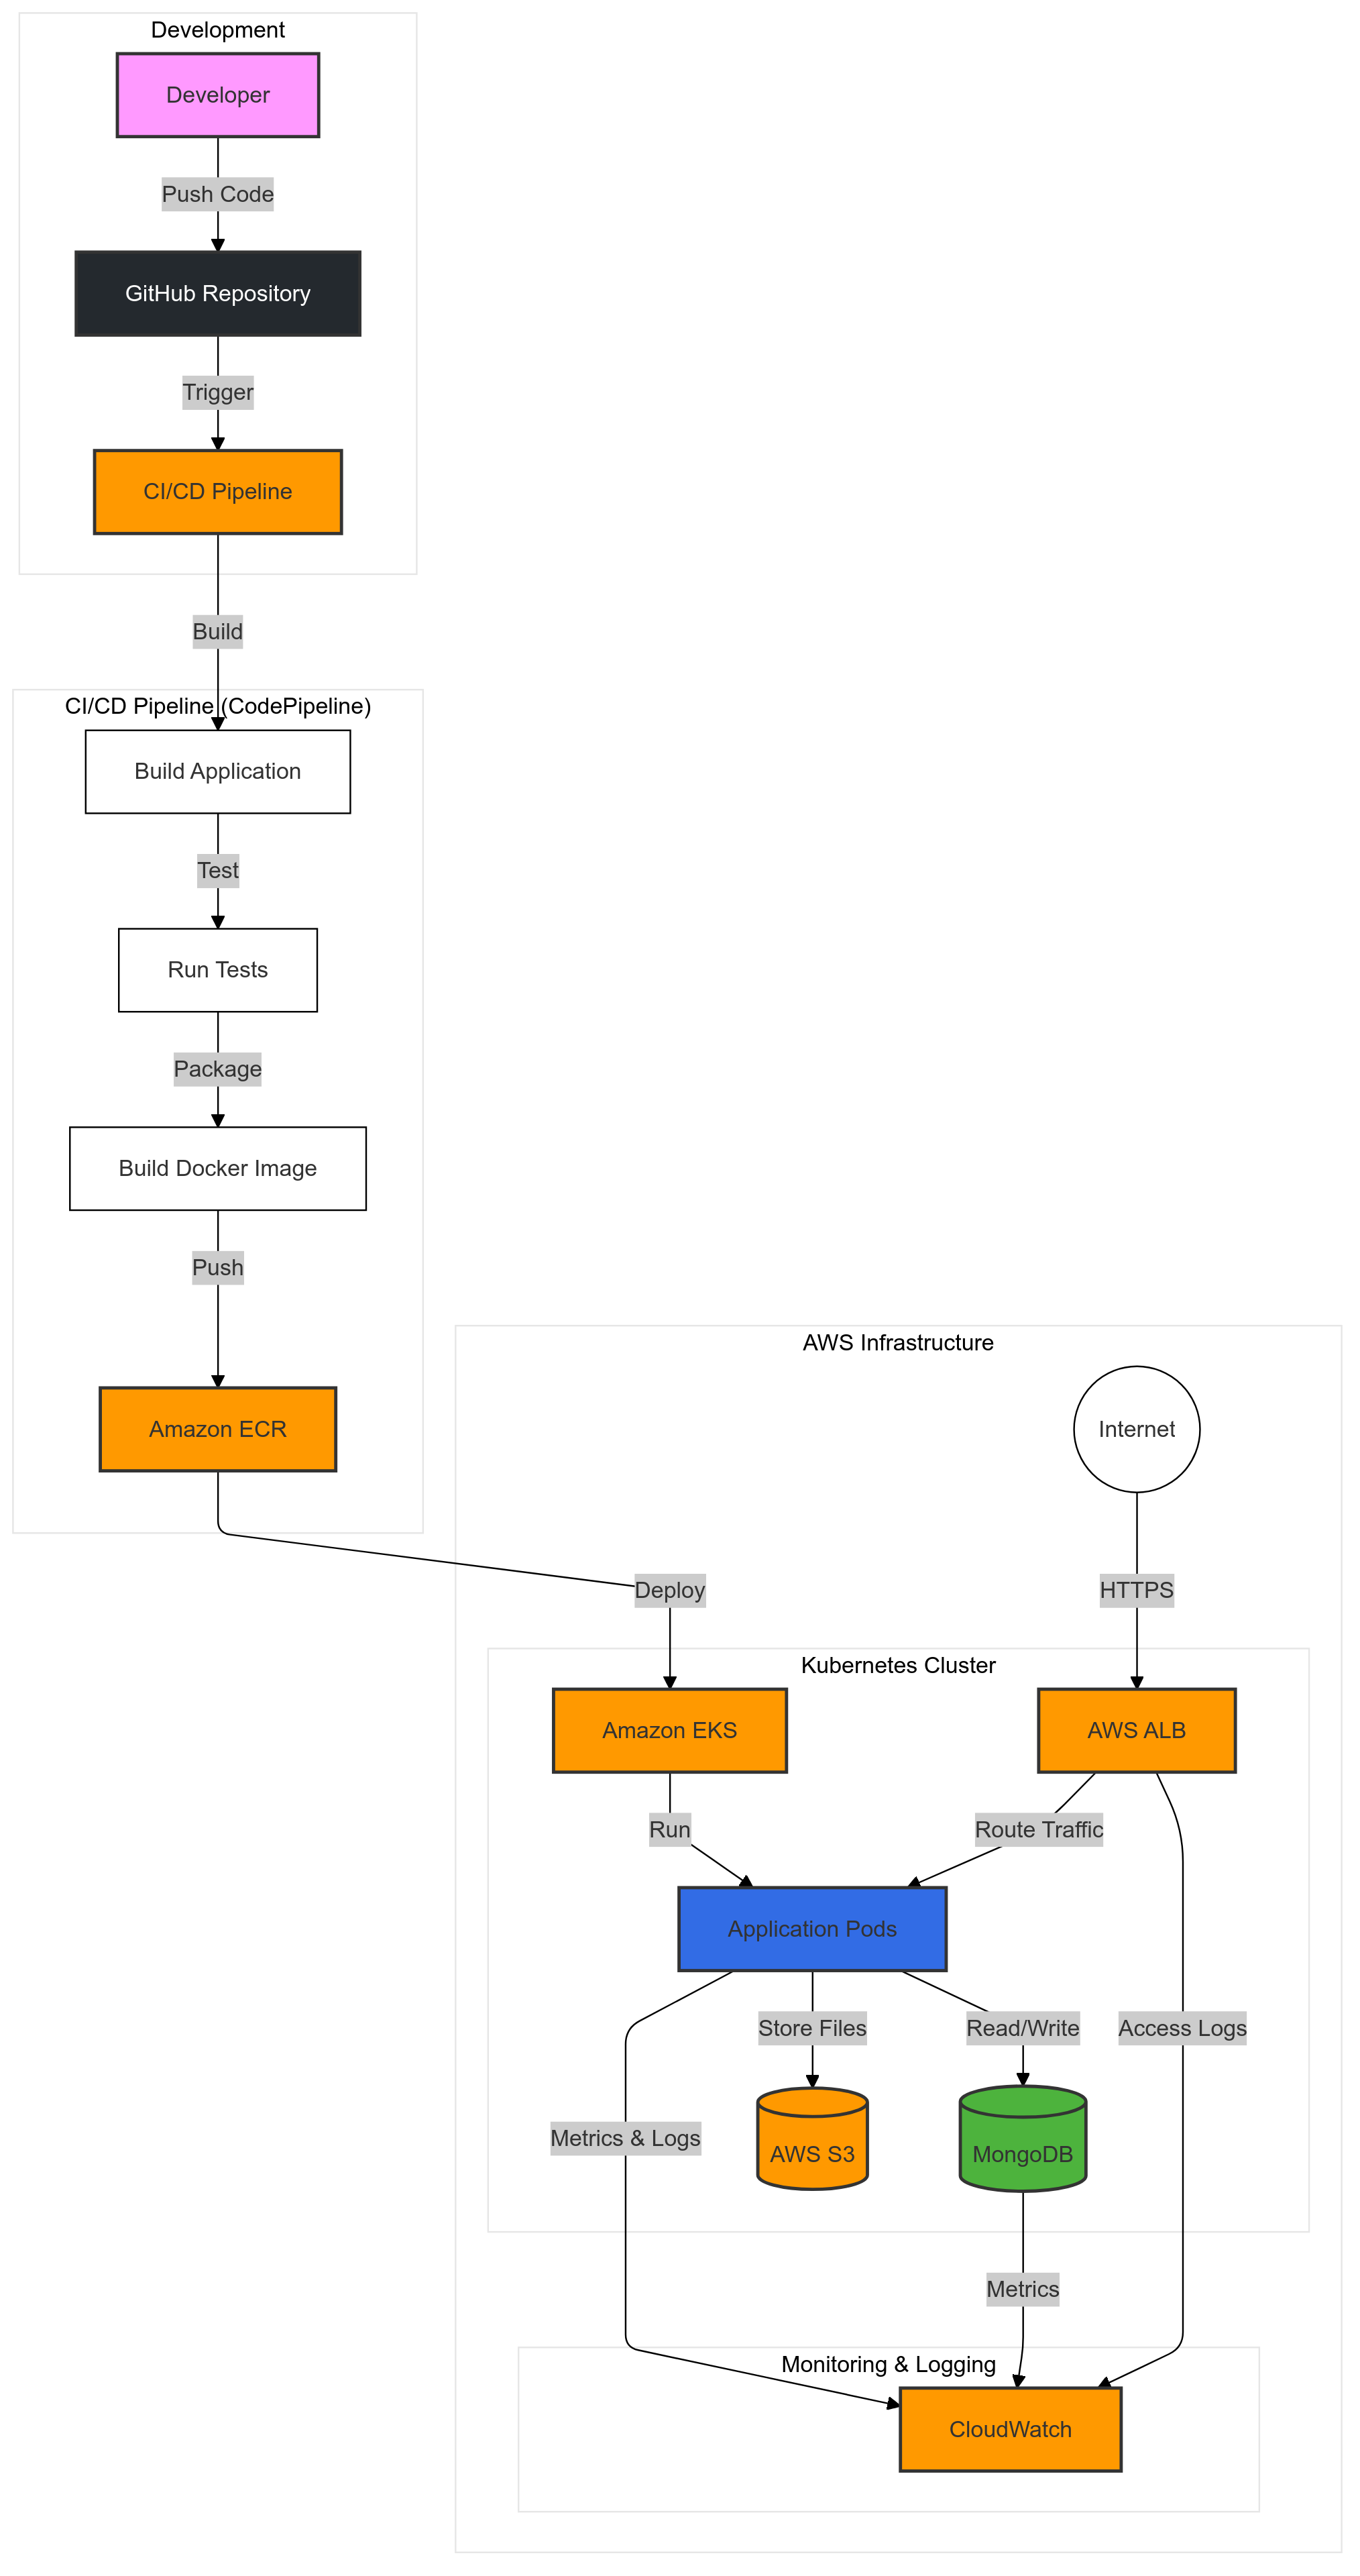
Fig 1. Architecture Diagram
Project Setup
Let's begin by establishing our Node.js application using Express. I have created a project that integrates essential AWS services including S3 bucket, MongoDB, and other critical components. You can access the complete project at Github link.
The project follows this structured organization:
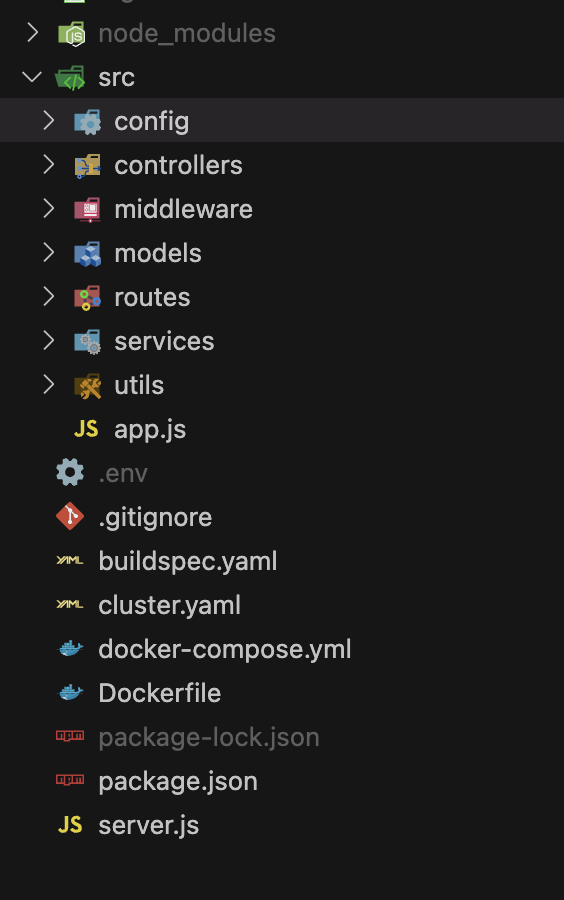
Fig 2. Folder Structure
💡 Note: Don't concern yourself with the Docker file and other folders like k8s at this stage. We will systematically create these in subsequent steps.
Docker Configuration
Docker serves as a containerization platform for your application, effectively packaging all necessary dependencies to ensure consistent execution across any environment. This containerization ensures your Node.js application maintains reliability from development through to production, eliminating concerns about dependency conflicts or configuration discrepancies.
Let's create our Dockerfile in the root directory:
Dockerfile
FROM node:18-alpine

WORKDIR /usr/src/app

COPY package*.json ./
RUN npm install

COPY . .

EXPOSE 8080

CMD ["npm", "start"]
Port 8080 has been specified to maintain consistency across both local development and Kubernetes environments.
ECR : Elastic Container Registry
ECR functions as a secure repository for your Docker images, ensuring they're stored safely and remain readily accessible by your Kubernetes cluster.
To utilize ECR, you must first establish an AWS account and create an ECR repository.
Step 1: Initialize your ECR repository
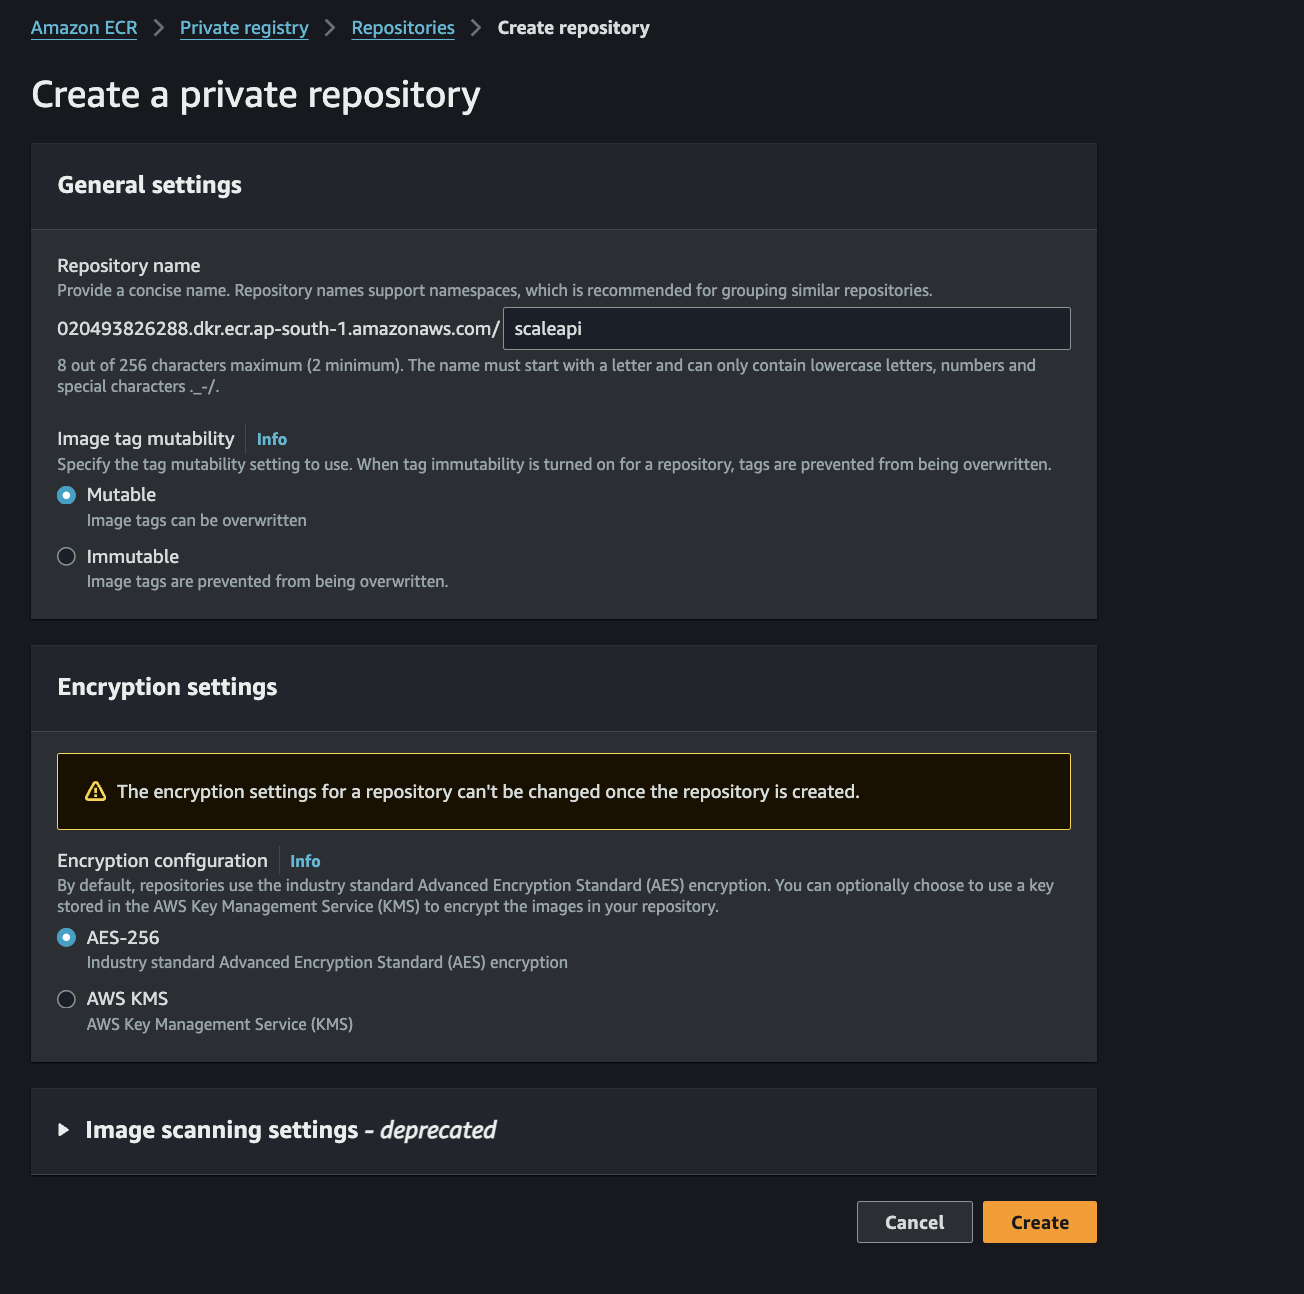
Fig 3. ECR Initialization
Click the create button to establish a repository named "scaleapi". You have the flexibility to choose any appropriate name for your repository.
Step 2: Upon creation, your repository will appear in the repository list.
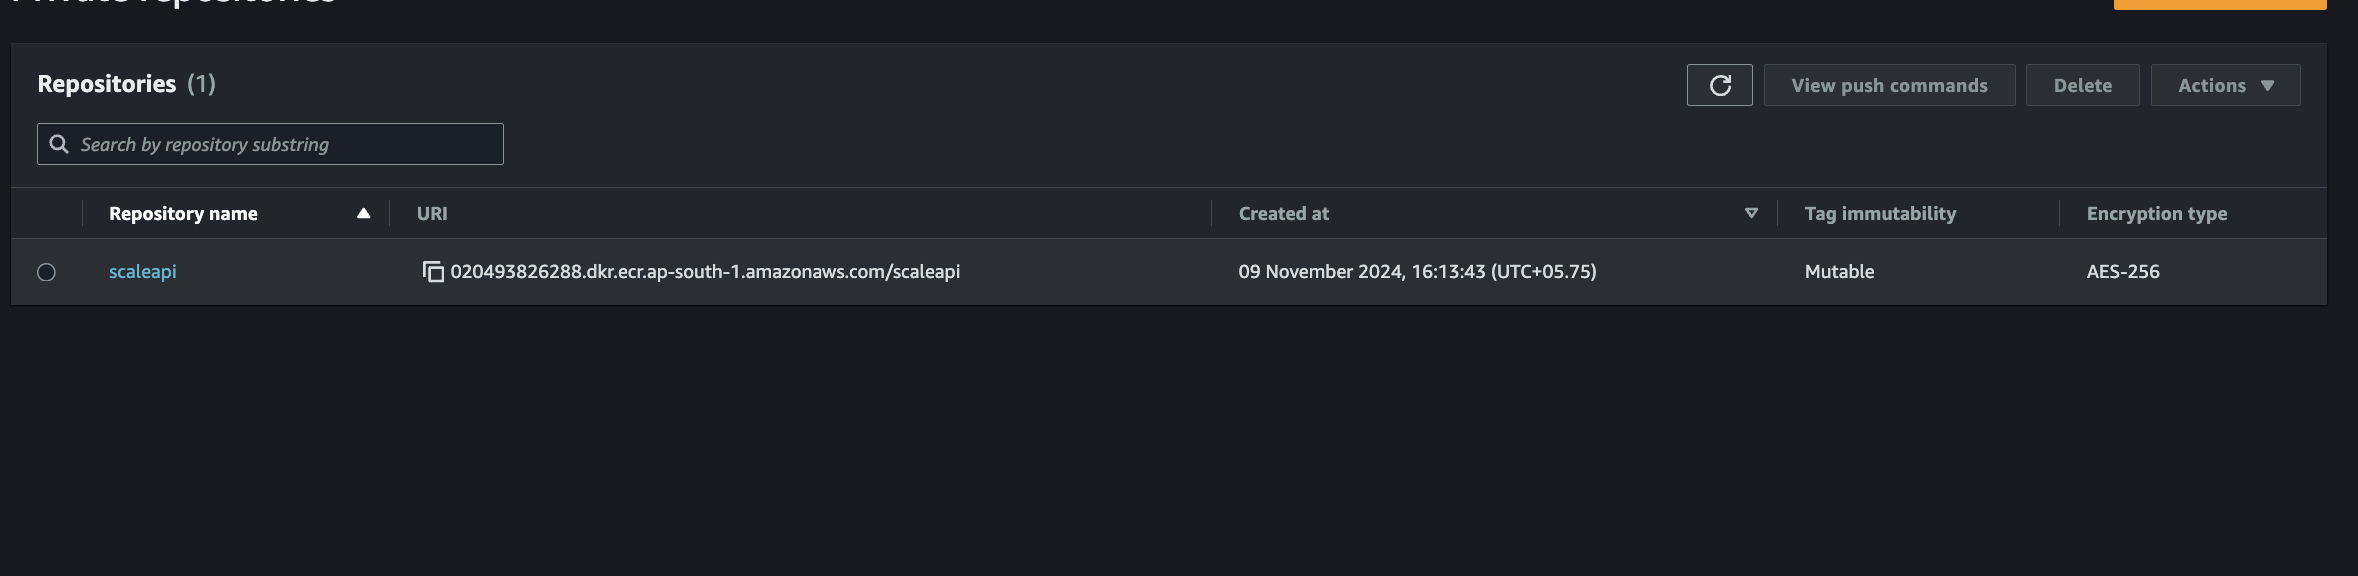
Fig 4. ECR Repository List
Step 3: Select your repository named "scaleapi" and access the "view push commands" option.

Fig 5. ECR Push Commands
To automate the image management process, we'll implement a buildspec.yaml file in the root directory. This file orchestrates the Docker image deployment to the ECR repository, handling local image building, pushing to ECR, and managing image tags.
Create a buildspec.yaml to automate your Docker image deployments:
version: 0.2

phases:
  pre_build:
    commands:
      - aws ecr get-login-password --region ap-south-1 | docker login --username AWS --password-stdin 020493826288.dkr.ecr.ap-south-1.amazonaws.com
  build:
    commands:
      - docker build -t scaleapi .
      - docker tag scaleapi:latest 020493826288.dkr.ecr.ap-south-1.amazonaws.com/scaleapi:latest
  post_build:
    commands:
      - docker push 020493826288.dkr.ecr.ap-south-1.amazonaws.com/scaleapi:latest
After configuring these files, commit and push your code to the GitHub repository.
CodePipeline: Continuous Integration and Continuous Deployment
CodePipeline operates as an orchestrator for your CI/CD pipeline, ensuring seamless execution of each step while providing clear visibility into any issues. Through CodePipeline, you can automate your build, test, and deployment processes, preparing your Node.js application for efficient scaling as demand grows.
Navigate to the AWS console and access the CodePipeline service. Initiate the pipeline creation process.
Step 1: Select the "Build custom pipeline" option.
Step 2:
- Assign the pipeline name "scaleapi-pipeline"
- For the service role, you may utilize an existing role or generate a new one
Your configuration should resemble:
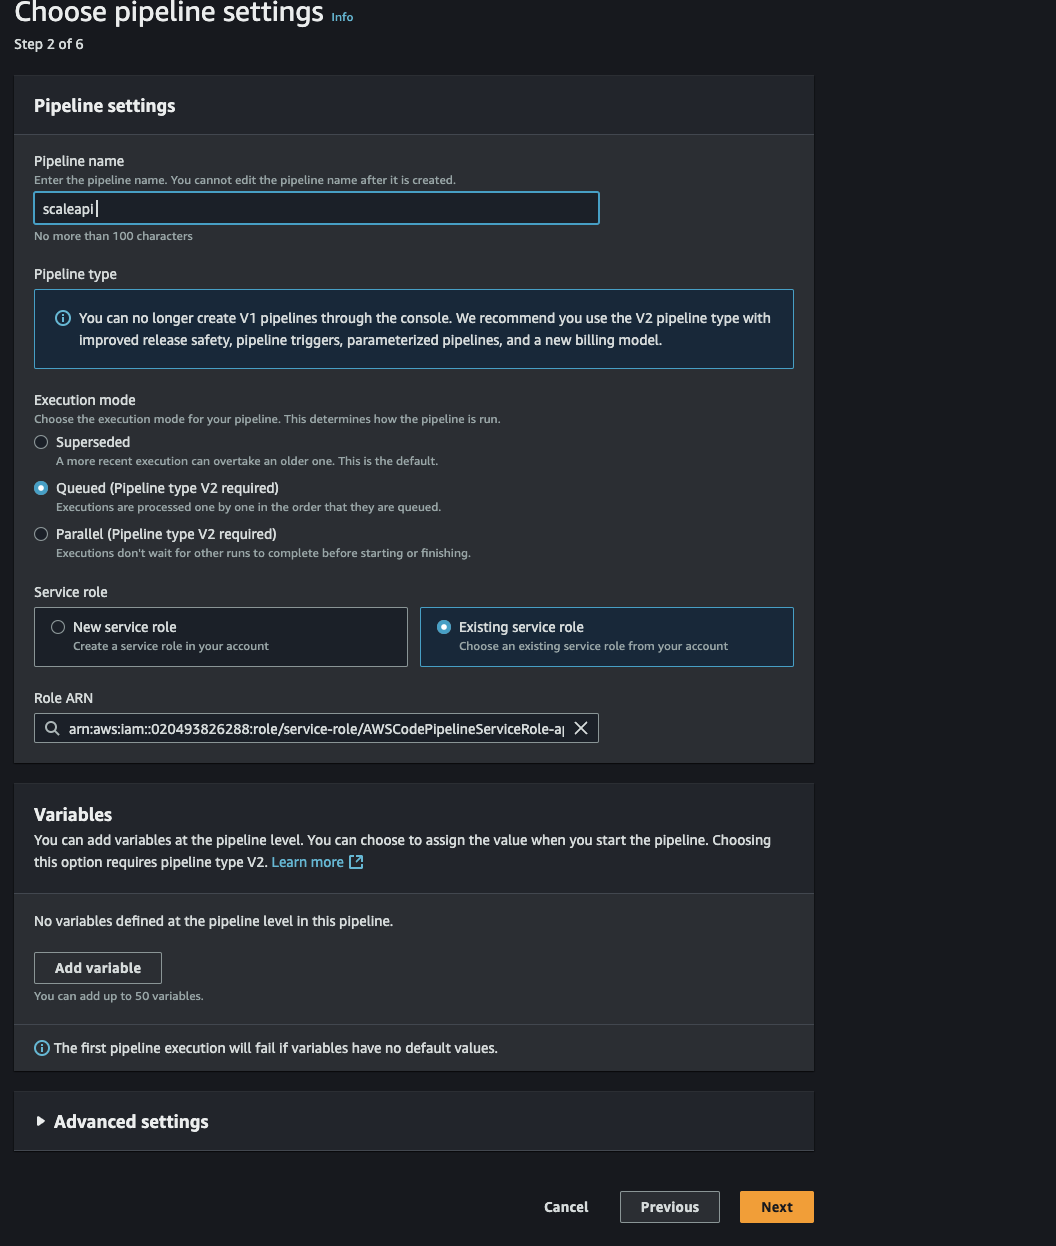
Fig 6. CodePipeline Configuration
Step 3: Configure GitHub as your source provider through the GitHub app:
- Initiate GitHub connection via the "Connect to GitHub" button
- Select your account and proceed with "Install and Authorize"
- Select your repository "scale_api"
- Proceed to the next step
- Specify "main" as your branch name in the include field
- Continue to the next section
Your configuration should appear as:
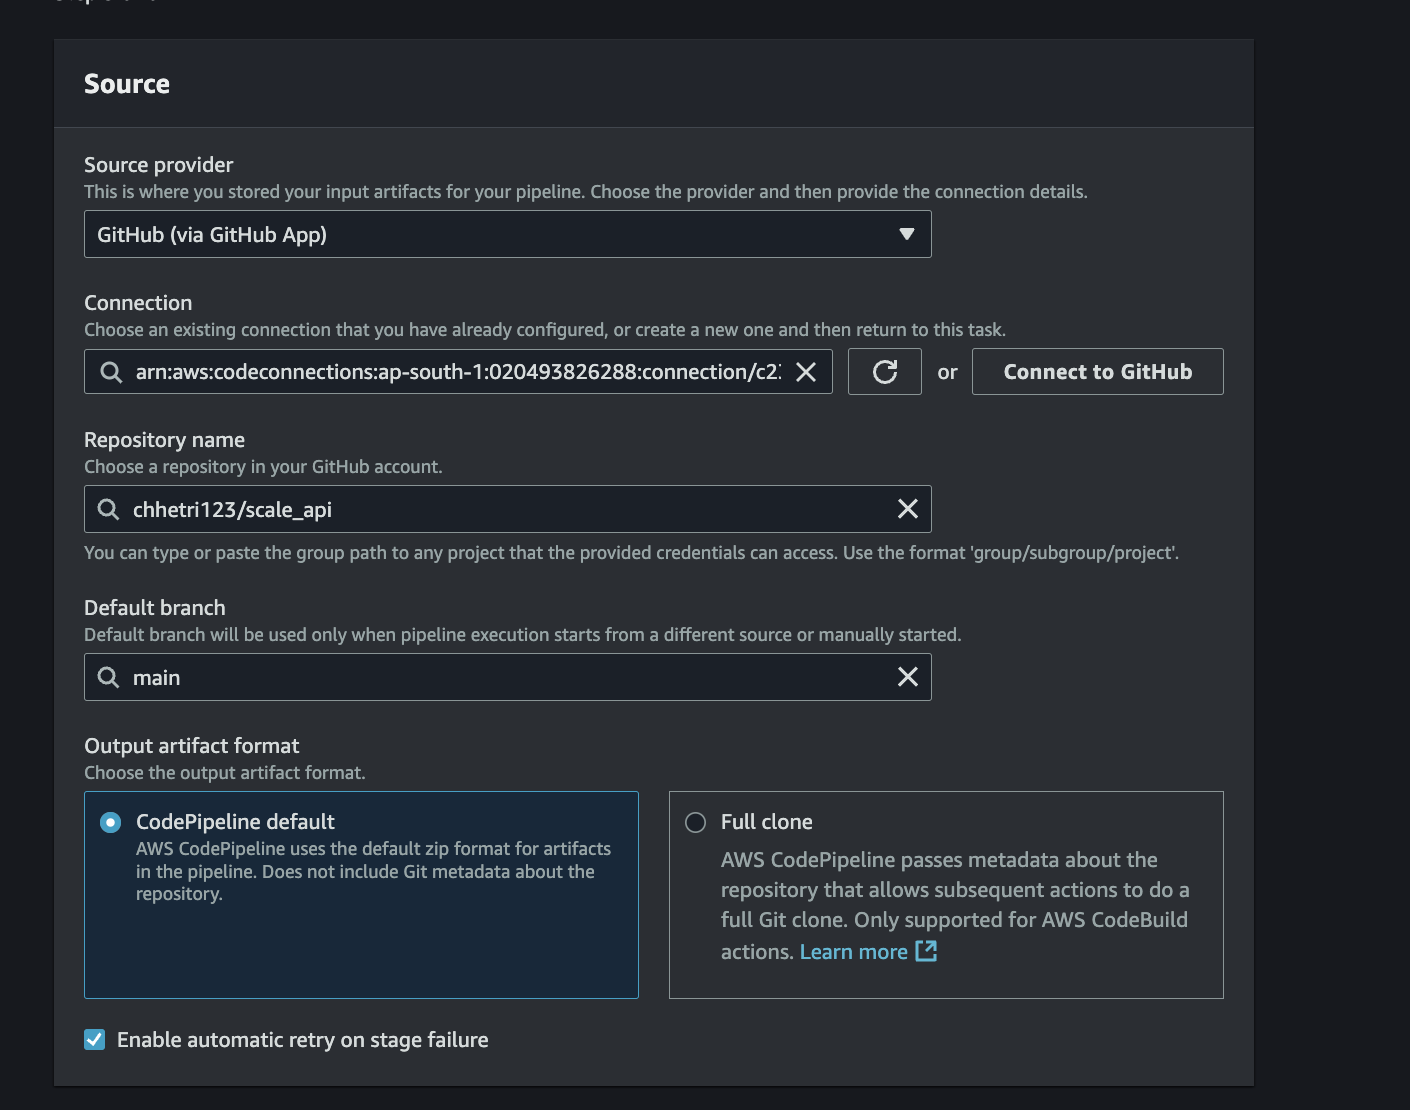
Fig 7. GitHub Source Configuration
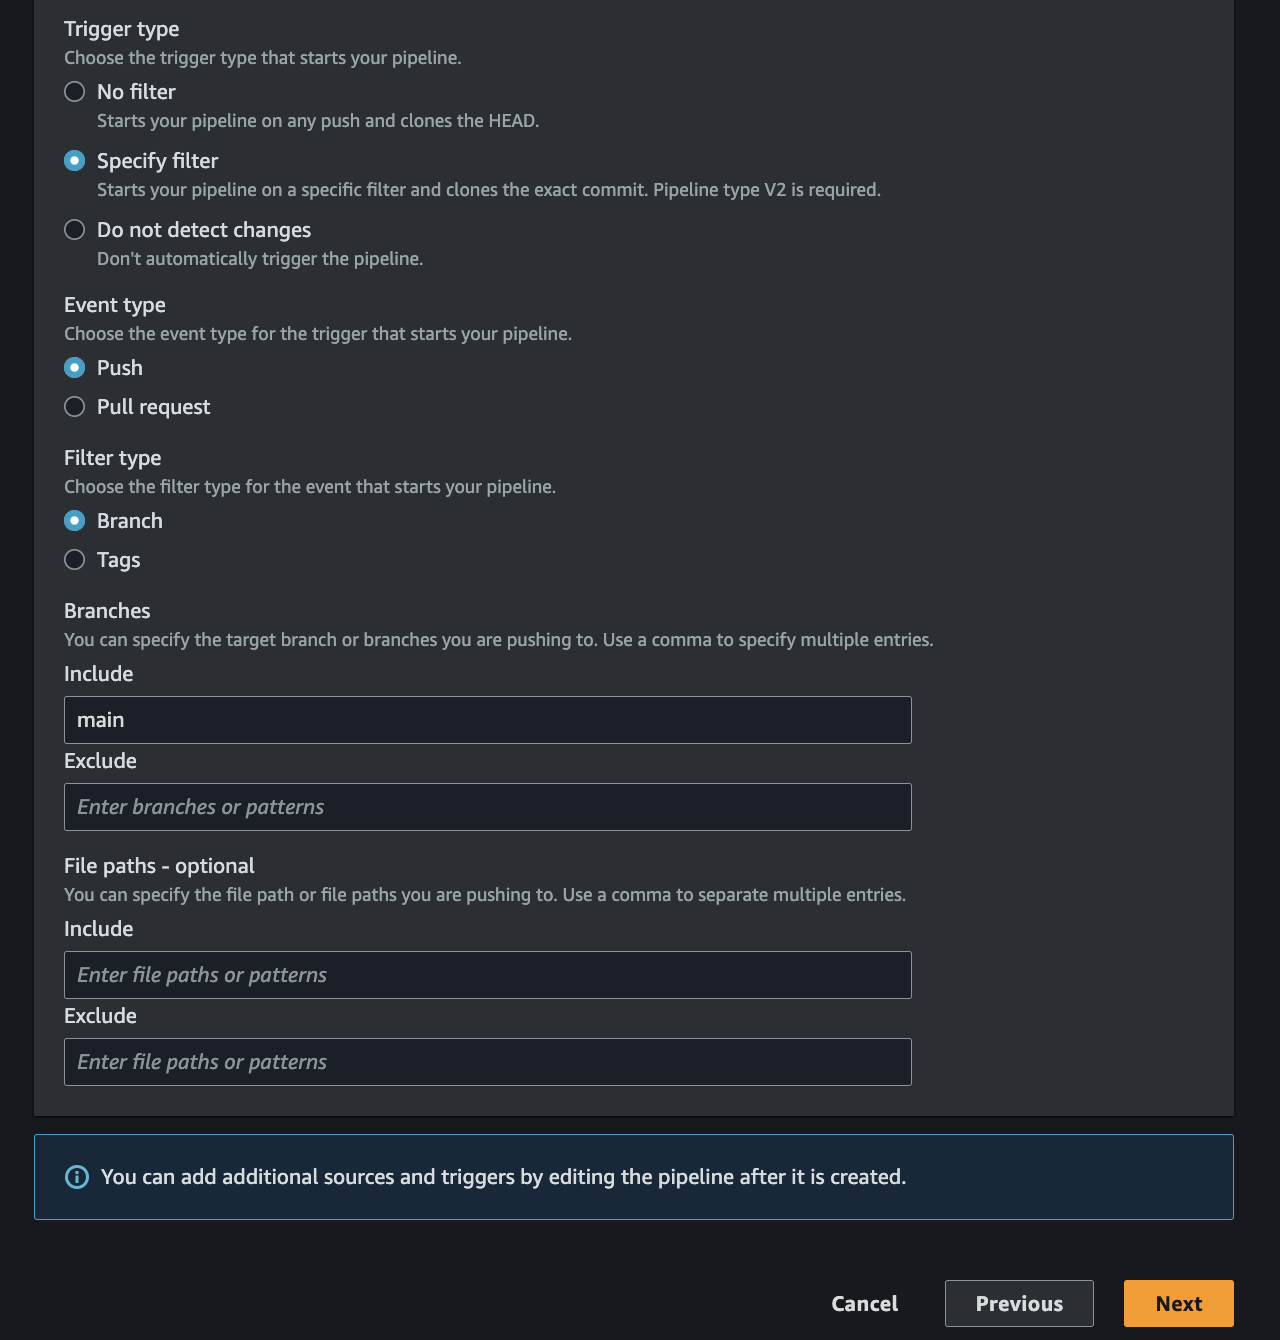
Fig 8. GitHub Branch Selection
Step 4: In the build stage configuration: Select "AWS CodeBuild" as your build provider and name your project "scaleapi-build". Proceed to the next step.
Step 5: Bypass the deploy stage by selecting "Skip deploy stage".
Step 6: Finalize the pipeline by clicking "Create pipeline".
Your pipeline will now appear in the pipeline list.

Fig 9. Pipeline List
Selecting your pipeline "scaleapi-pipeline" reveals the pipeline's operational status.
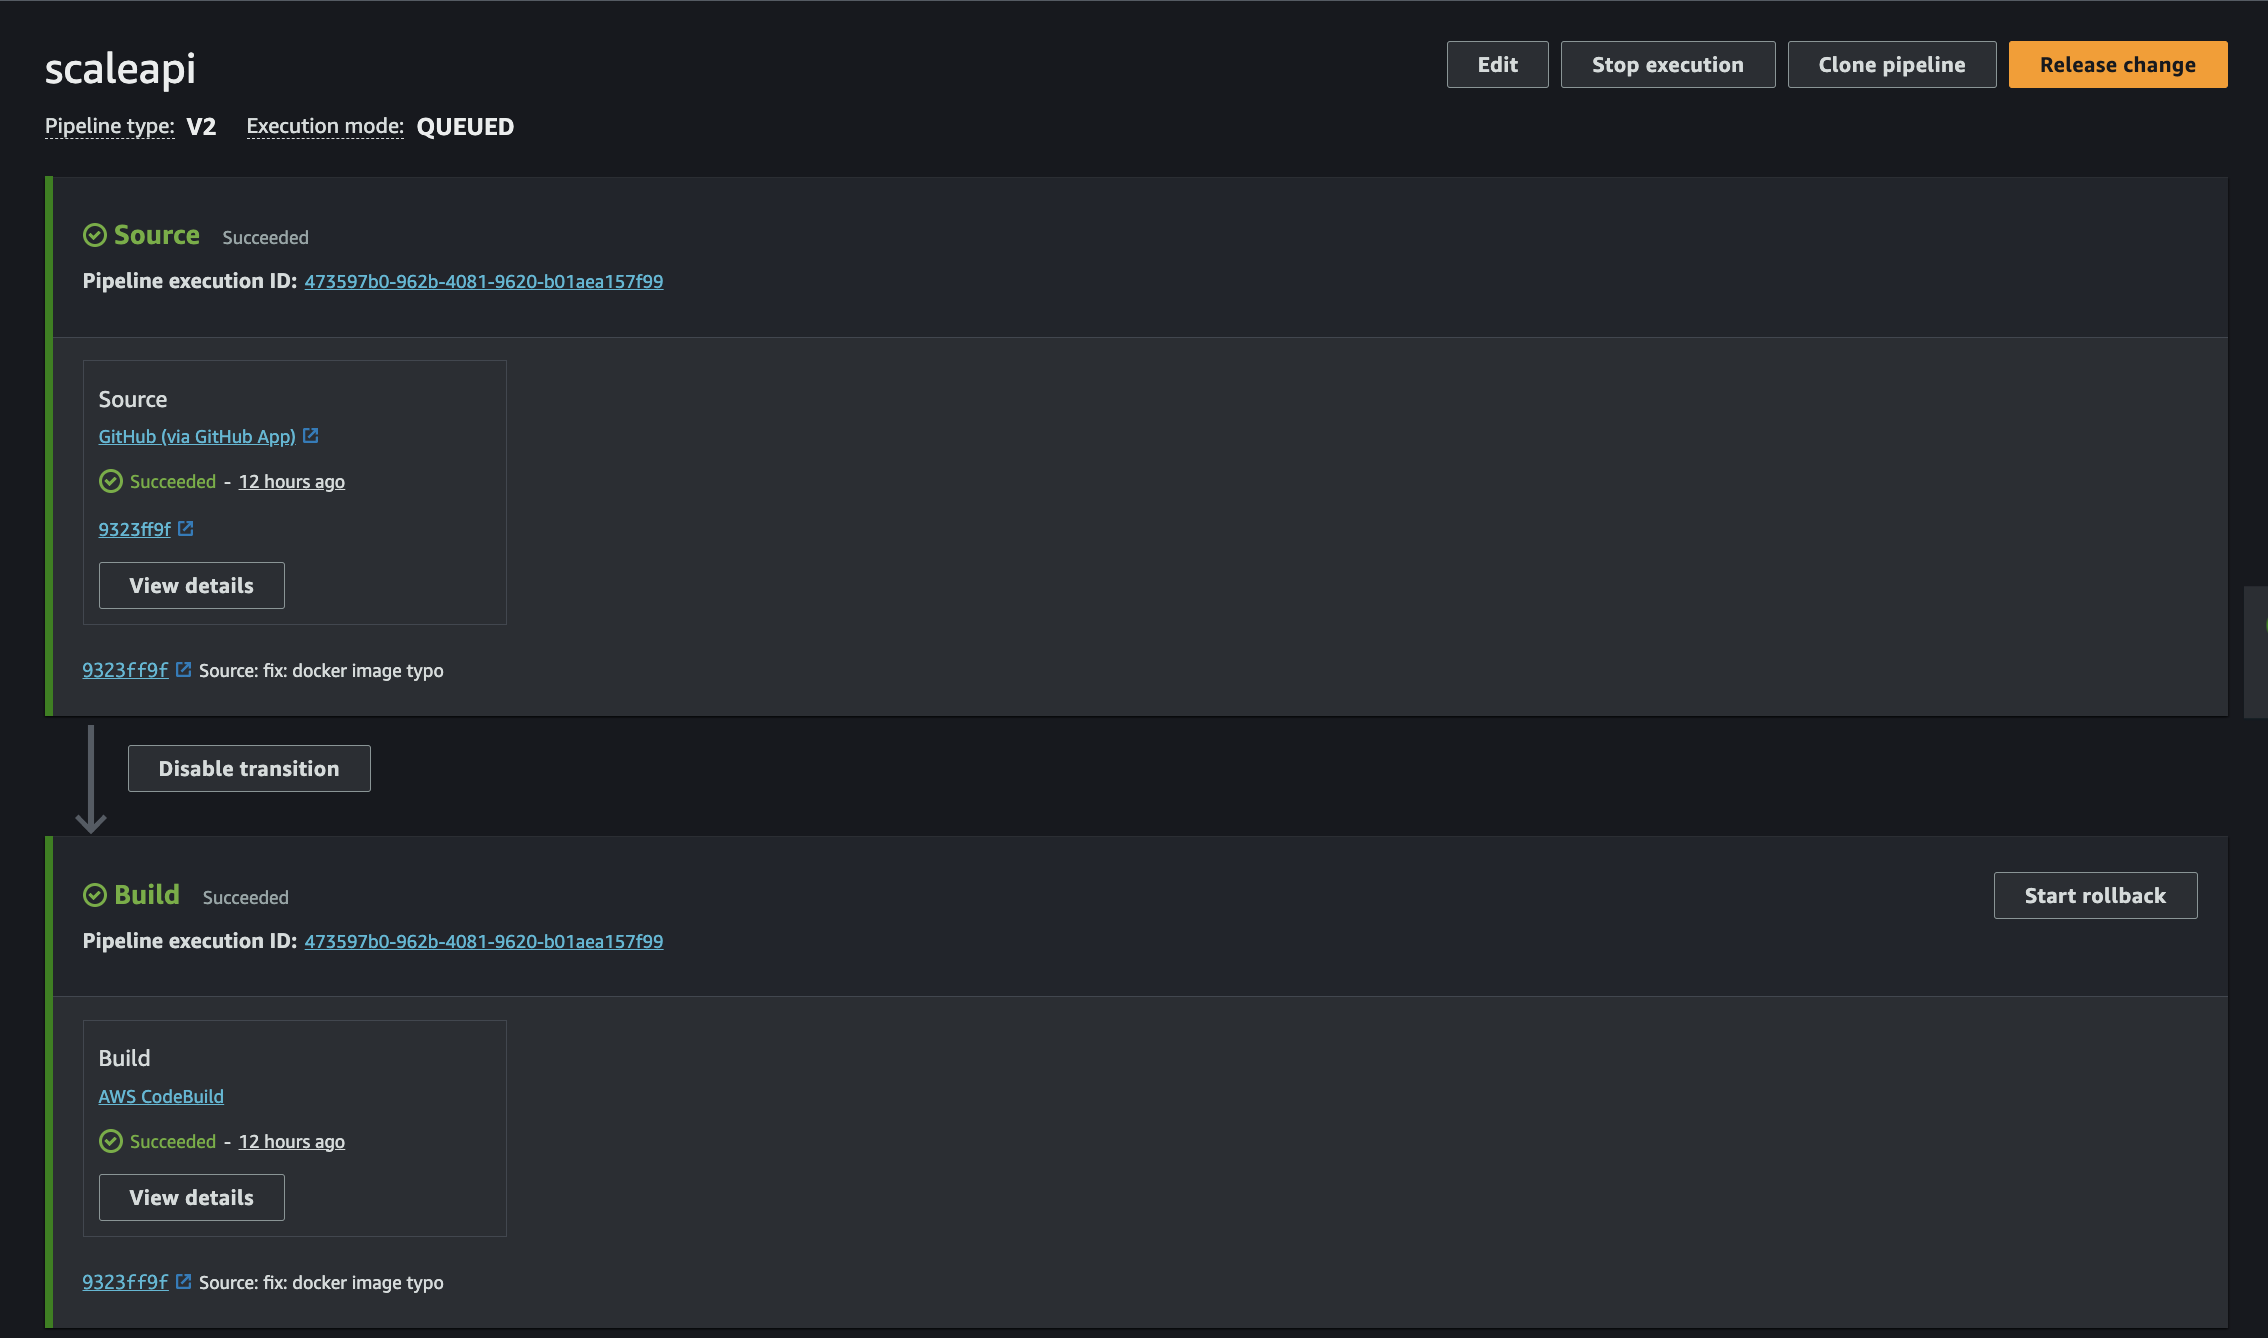
Fig 10. Pipeline Status
Within the build stage, you can monitor the build status.
If you encounter a GetAuthorizationToken failed: Unauthorized error, resolve it by:
- Navigating to
IAM/roles/ - Selecting the CodeBuild service role
- Accessing
Add permissions - Selecting
Attach policy - Searching for and attaching the
AmazonEC2ContainerRegistryPowerUserpolicy
Return to your pipeline and trigger a new release to verify the successful build completion.
Kubernetes Configuration : Deploying the Application
Kubernetes functions as an orchestrator for your application, managing and coordinating containers to ensure optimal performance and efficient scaling. It automates deployment, scaling, and operational tasks, maintaining your Node.js application's reliability even under increasing demands.
This implementation requires the installation of 'kubectl', 'aws cli', and "eksctl" on your local environment.
Prerequisites Installation
- Install AWS CLI
# For macOS (using Homebrew)
brew install awscli
- Install kubectl
# For macOS (using Homebrew)
brew install kubectl
- Install eksctl
# For macOS (using Homebrew)
brew tap weaveworks/tap
brew install weaveworks/tap/eksctl
Verify your installations:
aws --version
kubectl version --client
eksctl version
Step 1: Create your EKS cluster by first establishing a cluster.yaml file containing:
cluster.yaml
apiVersion: eksctl.io/v1alpha5
kind: ClusterConfig

metadata:
  name: scaleapi-node
  region: ap-south-1

nodeGroups:
  - name: ng-1
    instanceType: m5.large
    desiredCapacity: 3
    # will use ~/.ssh/id_rsa.pub as the default ssh key
Customize the instance type and capacity according to your requirements.
Step 2: Execute the cluster creation from your root directory:
eksctl create cluster -f cluster.yaml
This process typically requires 10-15 minutes for completion.
Step 3: Verify your cluster creation:
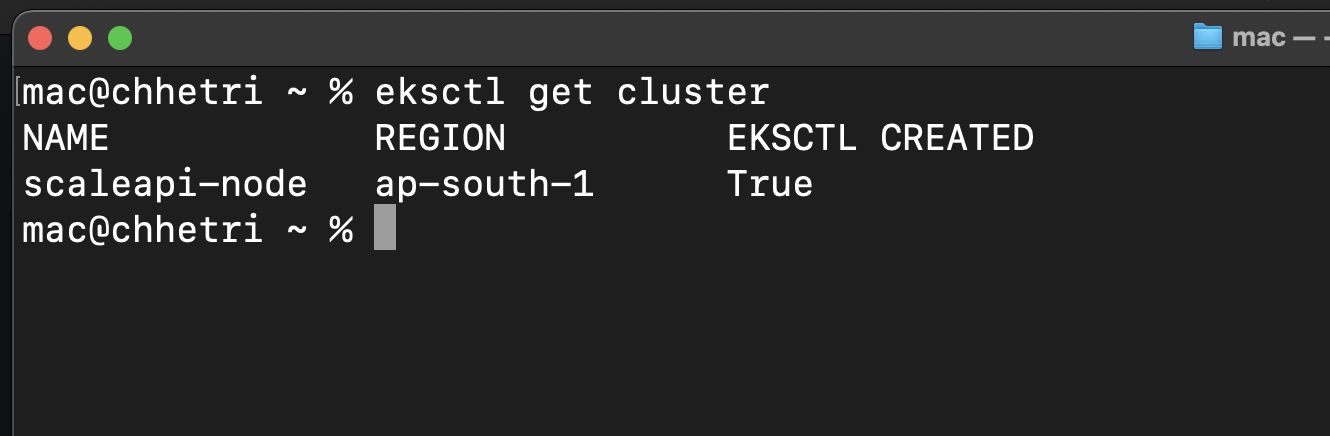
Fig 11. EKS Cluster Verification
Your cluster should now contain three nodes:

Fig 12. EKS Node Details
Helm Chart
Helm charts serve as blueprints for deploying applications on Kubernetes, providing a structured approach to define, install, and manage applications at scale. This package manager simplifies complex Kubernetes deployments by consolidating all necessary resources and configurations into a single, reusable chart.
Install Helm using:
brew install helm
Navigate to your k8s directory and execute:
helm install scaleapi .
Clear the templates directory and values.yaml file contents.
Step 3: For environment variable management, create Kubernetes secrets:
 kubectl create secret generic aws-secrets \
   --from-literal=AWS_ACCESS_KEY_ID='your aws access key id' \
   --from-literal=AWS_SECRET_ACCESS_KEY='your aws secret access key' \
   --from-literal=AWS_REGION='your aws region' \
  --from-literal=AWS_S3_BUCKET='your aws s3 bucket'
 kubectl create secret generic api-secrets \
  --from-literal=MONGODB_URI='your mongodb uri'
Verify secret creation:
kubectl get secrets
Step 4: Create deployment.yaml in your templates directory:
deployment.yaml
apiVersion: apps/v1
kind: Deployment
metadata:
  labels:
    app: scaleapi
  name: scaleapi
spec:
  replicas: 1
  selector:
    matchLabels:
      app: scaleapi
  template:
    metadata:
      labels:
        app: scaleapi
    spec:
      containers:
        - image: 020493826288.dkr.ecr.ap-south-1.amazonaws.com/scaleapi
          ports:
            - containerPort: 8080
          env:
            - name: AWS_ACCESS_KEY_ID
              valueFrom:
                secretKeyRef:
                  name: aws-secrets
                  key: AWS_ACCESS_KEY_ID
            - name: AWS_SECRET_ACCESS_KEY
              valueFrom:
                secretKeyRef:
                  name: aws-secrets
                  key: AWS_SECRET_ACCESS_KEY
            - name: AWS_REGION
              valueFrom:
                secretKeyRef:
                  name: aws-secrets
                  key: AWS_REGION
            - name: AWS_S3_BUCKET
              valueFrom:
                secretKeyRef:
                  name: aws-secrets
                  key: AWS_S3_BUCKET
            - name: MONGODB_URI
              valueFrom:
                secretKeyRef:
                  name: api-secrets
                  key: MONGODB_URI
            - name: PORT
              value: "8080"
Step 5: Apply your changes:
helm upgrade scaleapi .
Monitor your deployment:
kubectl get deployments
kubectl get pods
kubectl logs <pod-name>
Example output:
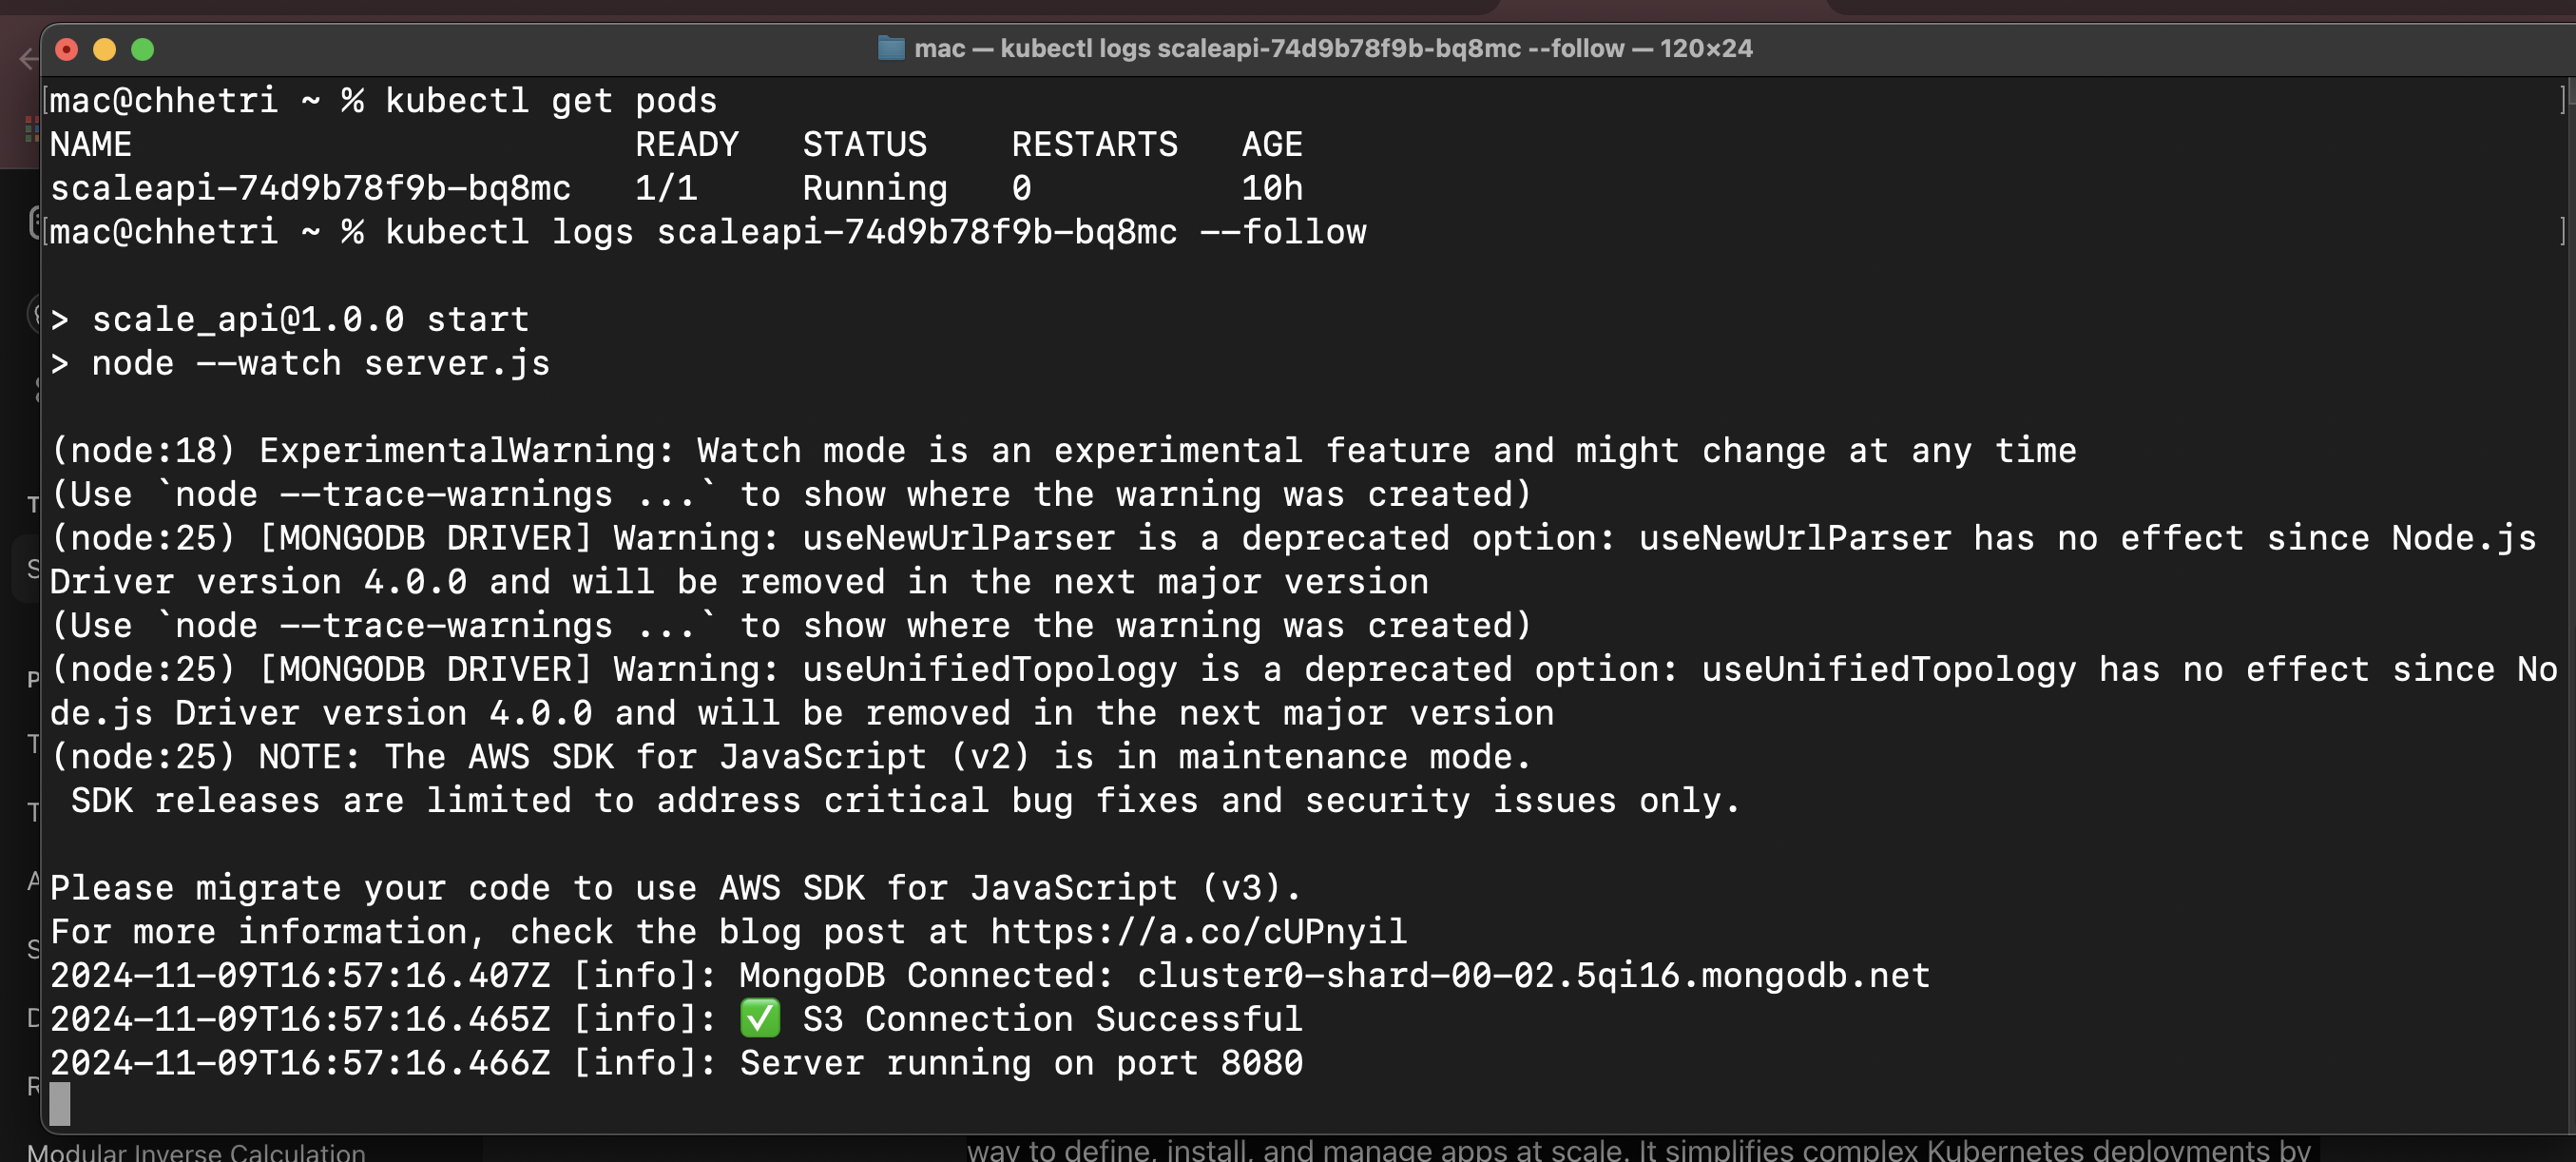
Fig 13. Deployment Logs
Your Node.js Application is now deployed with AWS EKS and CI/CD Pipeline.
To enable external access, implement a LoadBalancer.
LoadBalancer ( Ingress )
A LoadBalancer (Ingress) directs external traffic to your Kubernetes applications, efficiently routing requests to appropriate services within the cluster. This ensures your Node.js application remains accessible and scalable.
Step 1: Install the Load Balancer Controller following the official documentation or execute:
eksctl utils associate-iam-oidc-provider \
  --region ap-south-1 \
  --cluster scaleapi-node \
  --approve

curl -o iam-policy.json https://raw.githubusercontent.com/kubernetes-sigs/aws-load-balancer-controller/v2.10.0/docs/install/iam_policy.json

aws iam create-policy \
  --policy-name AWSLoadBalancerControllerIAMPolicy \
  --policy-document file://iam-policy.json

eksctl create iamserviceaccount \
--cluster=scaleapi-node \
--namespace=kube-system \
--name=aws-load-balancer-controller \
--attach-policy-arn=arn:aws:iam::<your-account-id>:policy/AWSLoadBalancerControllerIAMPolicy \
--override-existing-serviceaccounts \
--region ap-south-1 \
--approve

wget https://raw.githubusercontent.com/aws/eks-charts/master/stable/aws-load-balancer-controller/crds/crds.yaml

kubectl apply -f crds.yaml

helm install aws-load-balancer-controller eks/aws-load-balancer-controller -n kube-system --set clusterName=scaleapi-node --set serviceAccount.create=false --set serviceAccount.name=aws-load-balancer-controller
Remove iam-policy.json after successful installation.
Verify LoadBalancer status:
kubectl get pods -n kube-system
Expected output:
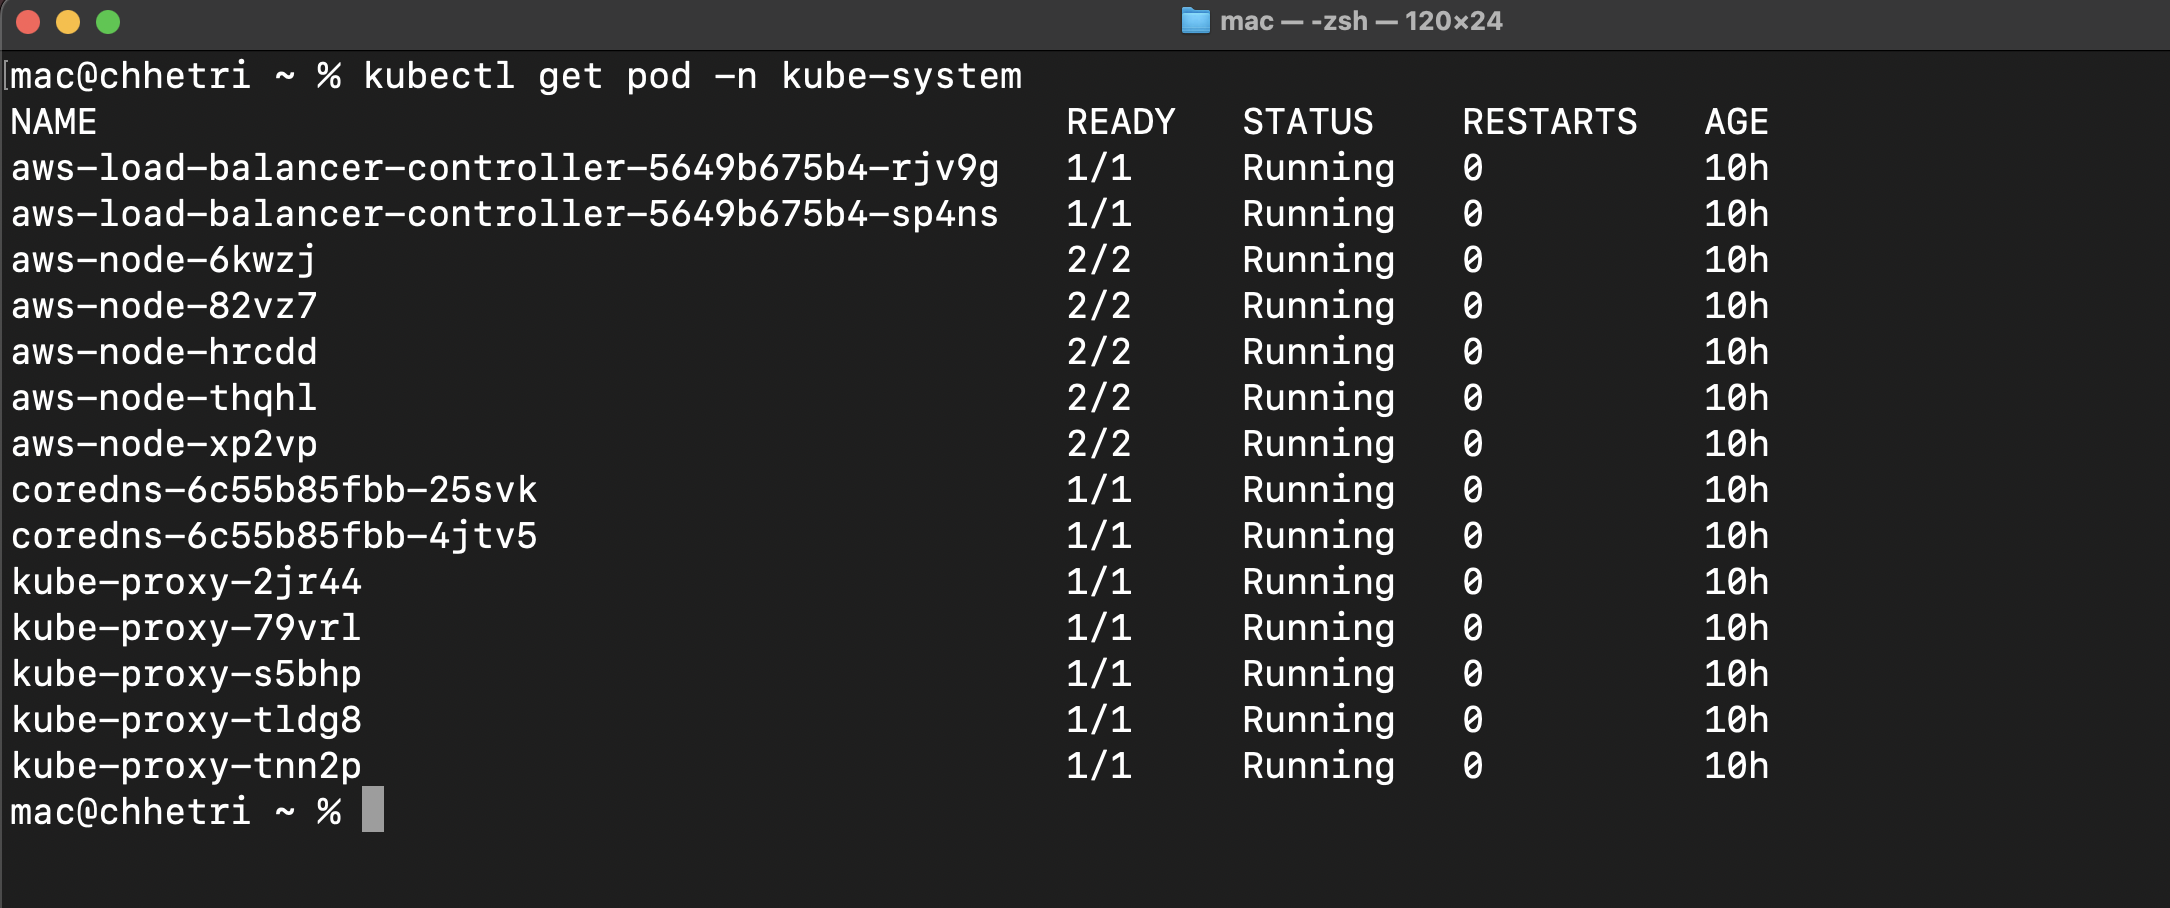
Fig 14. LoadBalancer Pods
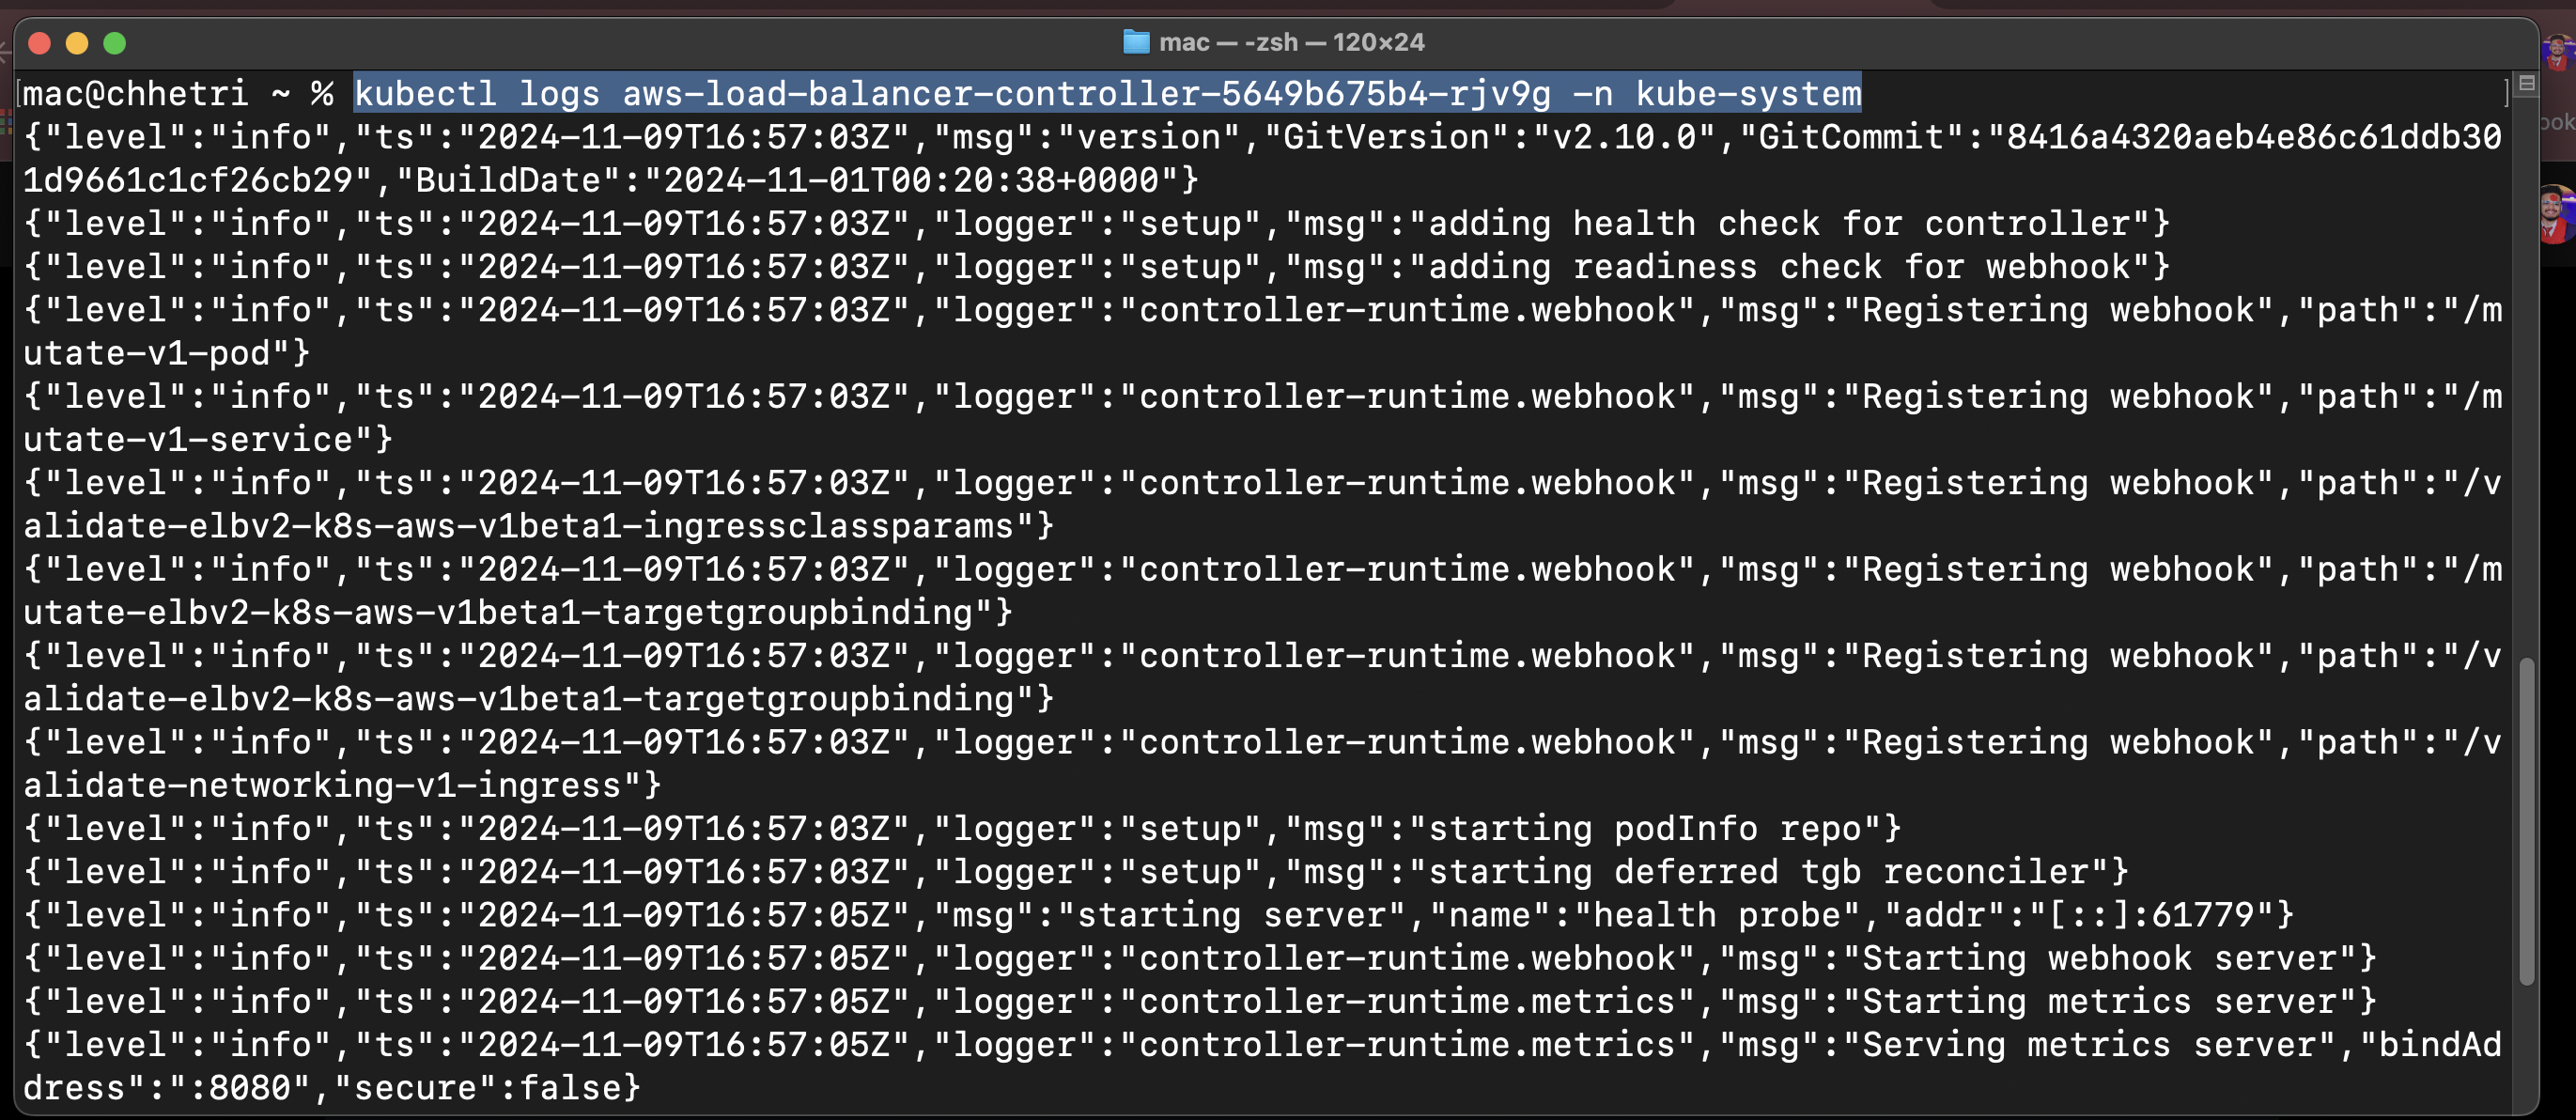
Fig 15. LoadBalancer Status
Step 3: Create ingress.yaml in your templates directory:
ingress.yaml
apiVersion: networking.k8s.io/v1
kind: Ingress
metadata:
  name: scaleapi-ingress
  annotations:
    alb.ingress.kubernetes.io/scheme: internet-facing
    alb.ingress.kubernetes.io/target-type: ip
spec:
  ingressClassName: alb
  rules:
    - http:
        paths:
          - path: /
            pathType: Prefix
            backend:
              service:
                name: scaleapi
                port:
                  number: 8080
Step 4: Apply your changes:
helm upgrade scaleapi .
Verify ingress creation:
kubectl get ingress
Your application should now have a provisioned address:

Fig 16. Ingress Address
Access your application through this address:
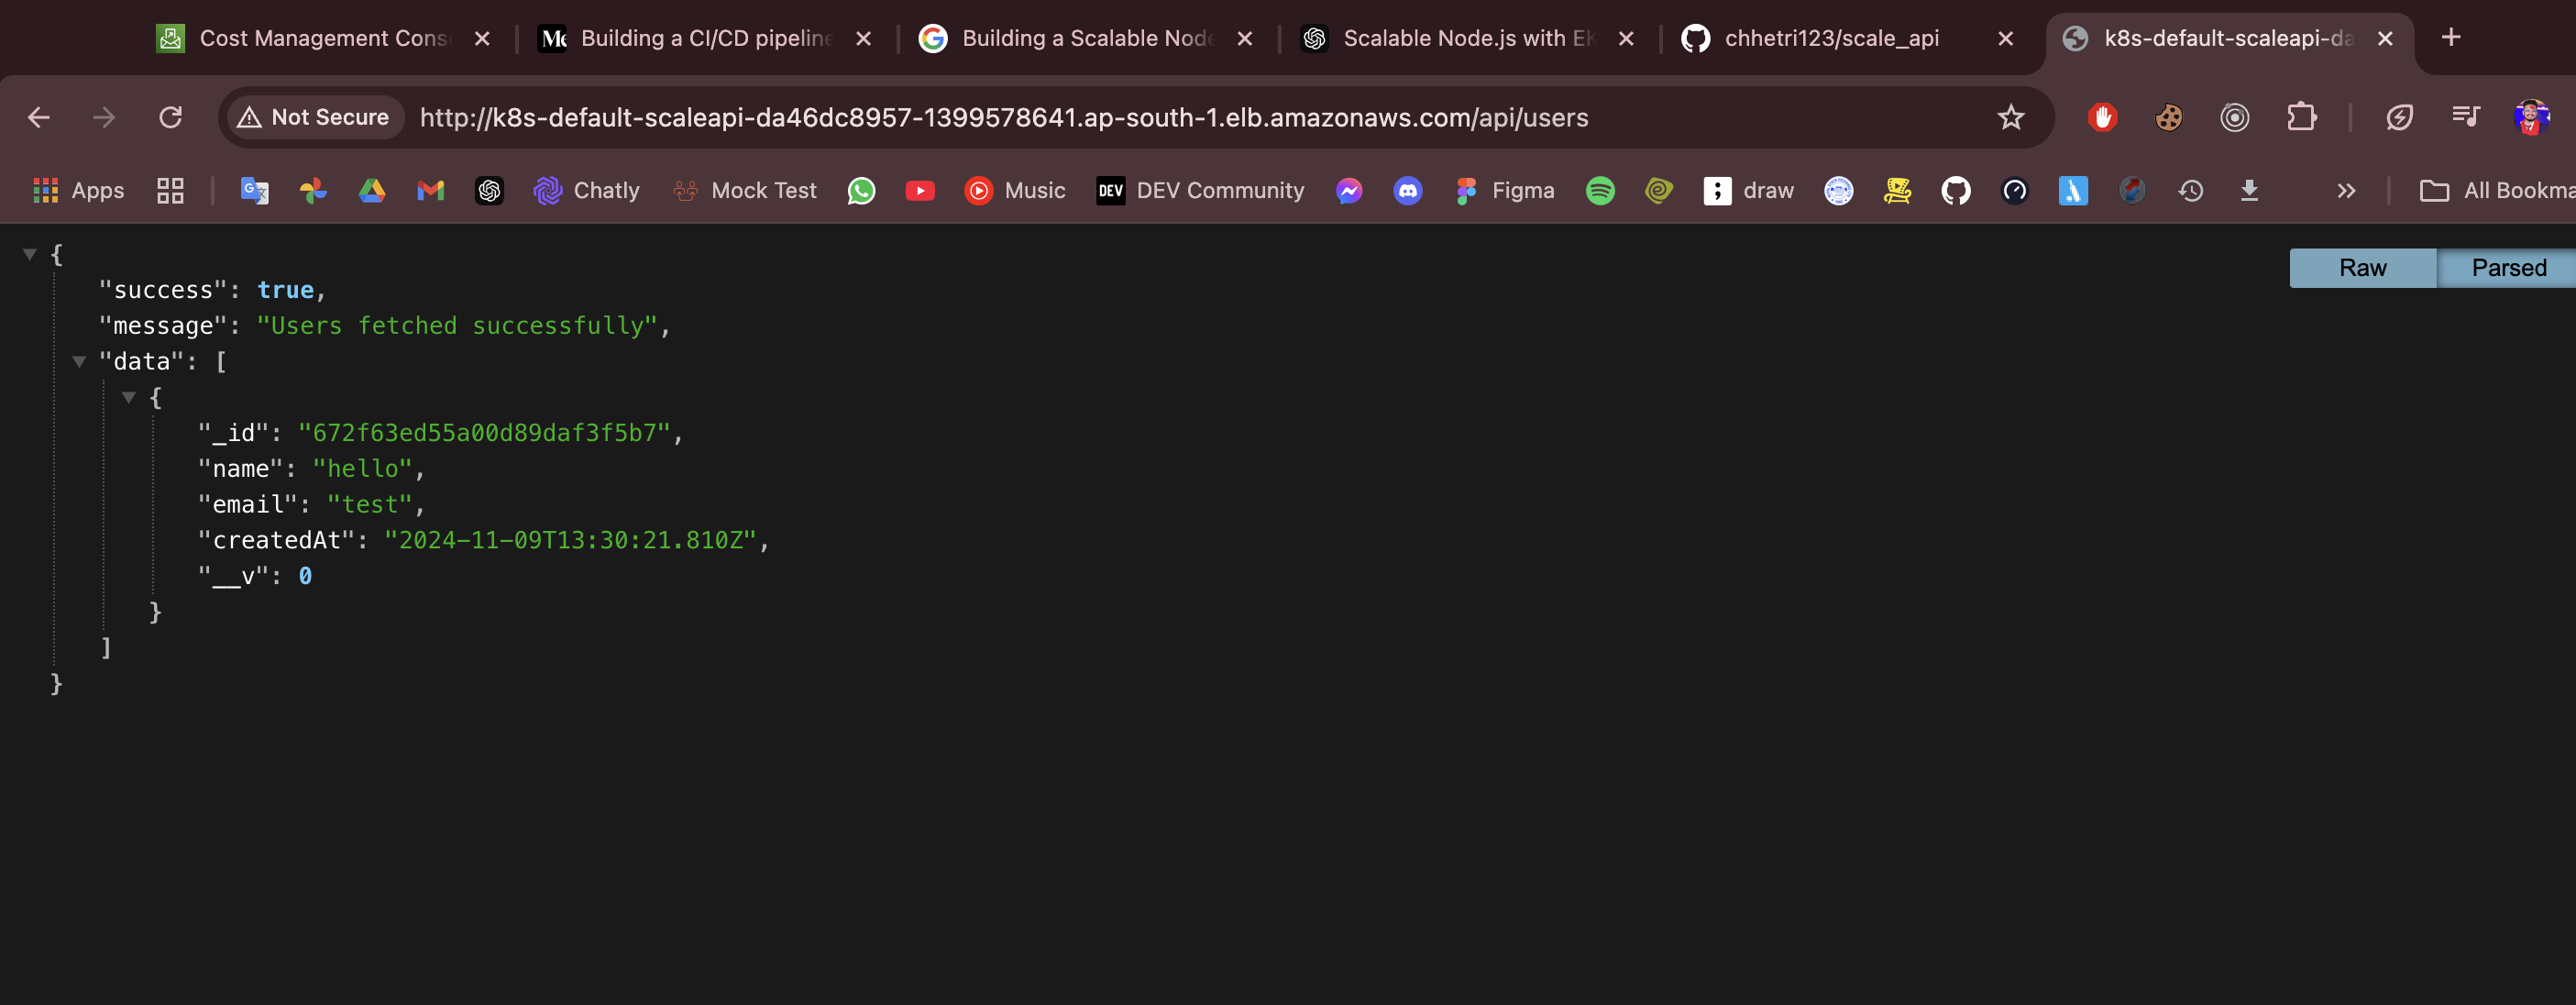
Fig 17. Application Access
In AWS services:
- Navigate to EC2 dashboard
- Access Load Balancer section
- Select scaleapi-ingress
- Review LoadBalancer details
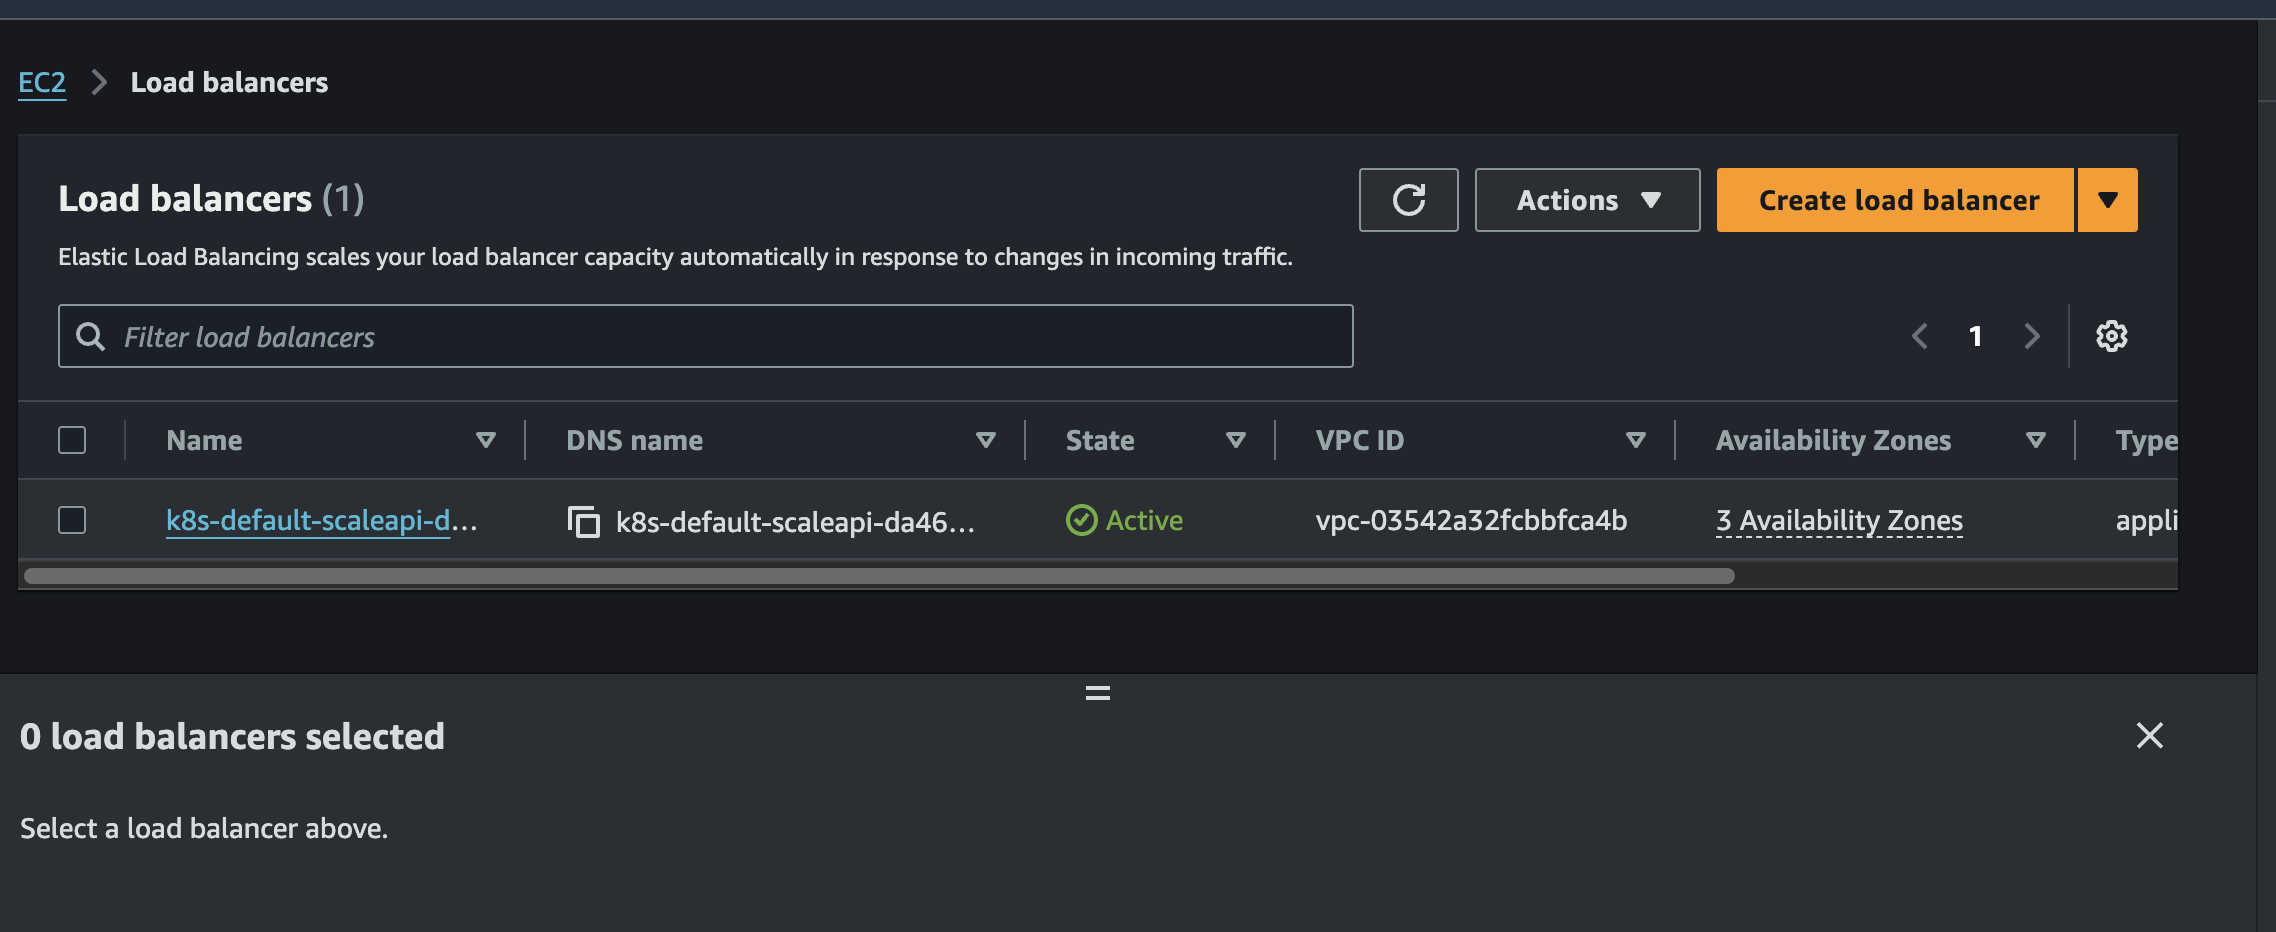
Fig 18. LoadBalancer Details
Monitor other services similarly. The infrastructure will automatically scale services as traffic increases.
Conclusion
This guide has demonstrated the complete process of building a scalable Node.js application using AWS EKS and CI/CD Pipeline. We've implemented essential AWS services including ECR, CodePipeline, EKS, LoadBalancer, and MongoDB. The guide covered deployment using Helm charts and establishing ingress for external access. This architecture ensures your application can scale efficiently while maintaining reliability and performance.